Guides
Signing with Polkadot Vault
Sign any transaction from a permanently offline phone with Polkadot Vault — transactions travel by QR code, the key never touches a networked device, and every QR carries its own metadata proof.
Every transaction command can sign on a Polkadot
Vault phone instead of a local keyfile. Pass
--signer vault and the CLI shows the transaction as a QR code; you scan it
with the Vault app, review the decoded call on the phone's screen, approve,
and show the phone's signature QR back to your webcam. The private key lives
on a device that never goes online — no keyfile, no password, and no mnemonic
ever exists on the machine running btcli.
Like Ledger signing, this works through RFC-0078
merkleized metadata:
the transaction QR embeds a compact cryptographic proof of the runtime types
the transaction touches, so the phone can decode and display exactly what you
are signing with nothing pre-loaded. The proof's digest is also signed into
the transaction (the CheckMetadataHash extension) and verified by the
chain, so the phone, the CLI, and the chain must all agree about what the
transaction means — nothing can show you "transfer 1 TAO" while signing
something else. There are no metadata updates to scan, ever, including after
runtime upgrades.
Setup
You do this once.
1. Dedicate a phone
Polkadot Vault is designed for a phone that stays offline forever: an old handset works. Install the app (iOS, Android — version 7.5 or later, which understands proof-carrying transactions), then put the phone in airplane mode and leave it there. The app nags you until you do.
2. Create a key set
In Vault, create a new key set and write the recovery phrase down on paper. This phrase is the coldkey — anyone with it has your funds, and the phone never displays it again outside the backup screen.
3. Add the Bittensor network
Vault ships knowing only Polkadot, Kusama, and Westend. Teach it Bittensor by scanning this chain specs QR with Vault's scanner and approving it:
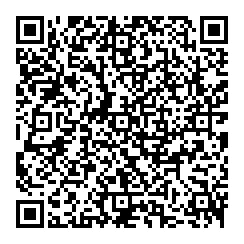
It tells the phone the network's name, address format, and token (signed by the Opentensor Foundation's verifier key, so Vault shows it as verified), and it is the only setup scan the phone ever needs — transaction QRs carry their own metadata proof, so there are no metadata updates, ever.
4. Derive a Bittensor key
In the key set, add a derived key for the Bittensor network. Tapping the key shows its address as a QR code — that address is your new coldkey account.
Import the address into btcli
The machine running btcli only ever needs the public address. Scan it
straight off the phone into your address book:
btcli addresses add my-vault --vaultA local page opens with your webcam; open the key in Vault so its address QR
is on screen, and hold the phone up to the camera. The address is validated
and saved under the name my-vault. (No camera? Skip --vault and paste the
ss58 instead: btcli addresses add my-vault 5F....)
Fund the account
Every signed transaction pays a fee, so a completely empty account cannot submit anything — send a little TAO to the new address first. A fraction of a TAO covers many transactions (a transfer's fee is on the order of 0.0002 TAO).
Sign a transaction
Add --signer vault to any transaction. For a first end-to-end
test that moves nothing anywhere, transfer a small amount from the vault
account to itself — the only cost is the fee:
btcli wallet transfer --dest my-vault --amount 0.001 --signer vault --signer-address my-vaultWhat happens:
- The transaction is prepared exactly as usual — same fee estimate, same
preview, same confirmation prompt (
--dry-runpreviews without signing). - A local page opens showing the transaction QR (animated when it doesn't fit in one code) next to a live webcam panel, with a summary of what is being signed.
- Scan the QR with Vault. The phone decodes the call — pallet, method, destination, amount, fee context — verifies the embedded metadata proof, and asks for approval.
- Approve on the phone. Vault displays a signature QR.
- Hold the phone up to the webcam. The page captures the signature, the CLI verifies it against the transaction before submitting (a stale or mismatched scan is rejected on the spot), submits, and reports inclusion as usual. The page flips to its success state.
The transaction is mortal: the signature must come back within the era window (about 25 minutes at the default period), or the CLI times out and the command must be re-run.
For routine use, pin the account once and stop typing it:
btcli config set signer_address <the vault ss58>--signer-address accepts a raw ss58 or an address-book name; when omitted,
it falls back to the configured wallet's coldkeypub — so a pubkey-only wallet
whose coldkeypub matches the Vault key makes -w my-wallet --signer vault
work with no address flag at all.
Options
| Option | Env | Config key | Meaning |
|---|---|---|---|
--signer vault | sign via Polkadot Vault QR round-trip | ||
--signer-address | BT_SIGNER_ADDRESS | signer_address | ss58 or address-book name of the Vault account (default: the wallet's coldkeypub) |
--extension-browser | BT_EXTENSION_BROWSER | extension_browser | browser for the signing page (firefox, chrome, or an app name) |
The signing page binds to 127.0.0.1 on an ephemeral port and its URL is
scoped to one session — a leftover tab from an earlier run cannot see or sign
anything. Only the public address and the signature ever cross the camera
gap.
MEV-shielded transactions
Stake-trading commands submit MEV-shielded by default — the signed transaction is encrypted so the mempool can't front-run it — and that stays true with the vault signer. The catch is speed: the shield requires the transaction to be signed with an 8-block era, so you have about 96 seconds from the first QR appearing to complete the flow, and a shielded submission means two scans back to back (the shielded transaction, then the encrypted carrier extrinsic that delivers it).
The CLI sets you up to make the window: it opens the signing page and waits for your webcam before starting the clock, tells you to have Vault's scanner ready, labels each QR ("scan 1 of 2", "scan 2 of 2"), and shows a live countdown on the page. If the window closes before both scans finish, nothing is lost — the signature expires harmlessly and the CLI reports it; re-run the command and scan faster. With the phone unlocked and in hand, two scans in 90 seconds is comfortable; fumbling for the phone after confirming is what misses it.
To skip the shield (and the time pressure) on a stake command, pass
--no-mev-shield — the transaction then submits like any other, visible in
the mempool.
Limitations
- Extrinsics only. Raw message signing (
btcli wallet sign) is refused — Vault only signs what it can decode and display. - One camera hop each way. The webcam needs to see the phone's screen; laptop cameras work fine in normal lighting.
Python
The same signer is available to the SDK. A VaultSigner stands in for the
wallet in plan and execute:
import bittensor as bt

signer = bt.VaultSigner("5F...")   # the Vault account's ss58

async with bt.Subtensor() as client:
    intent = bt.Transfer(dest_ss58="5F...", amount_tao=0.001)
    result = await client.execute(intent, signer)   # opens the QR page, waits for the scan
The signer implements the transport's clear-signing capabilities: it computes
the RFC-0078 metadata digest for the exact runtime the payload targets
(metadata_digest) and frames prepared extrinsics as proof-carrying Vault
QRs (sign_unsigned_extrinsic). Raw sign(bytes) calls are refused by
design. Every returned signature is verified against the signing payload
before the SDK accepts it.
Troubleshooting
- Vault says "unknown network" — the chain specs were never added; scan the chain-specs QR in setup step 3 once.
- Vault shows an error instead of the decoded call — the app is too old to understand proof-carrying payloads; update Polkadot Vault (7.5+).
- "camera access failed" on the signing page — allow camera access for the page in the browser and reload the tab; the session survives a reload.
- "the scanned signature does not verify" — the camera caught a QR from an earlier transaction, or a different key signed; re-scan the signature Vault is showing for this transaction.
- "timed out waiting for the Vault signature scan" — the era expired while the transaction waited; re-run the command and complete the scan within the window.
- Vault shows only a hash — the call is too large to display and Vault falls back to blind-signing it; the CLI warns when this happens.